
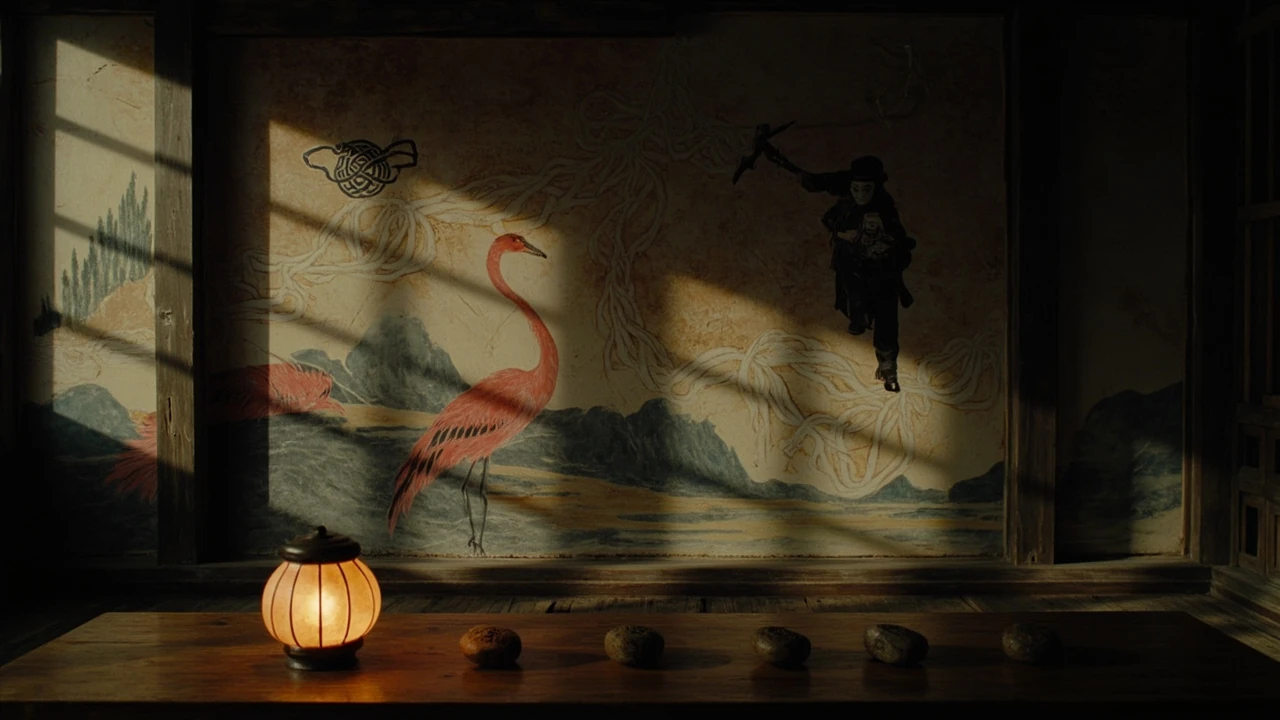
Silent Hill f mural puzzle: what it is and how to approach it
The silent hill f mural puzzle is a story-integrated environmental challenge in Silent Hill f, a survival horror title developed by NeoBards Entertainment and published by Konami. Unlike a generic combination lock, the puzzle is built into a painted wall that doubles as a piece of environmental storytelling, and the artwork itself carries the clues that determine the order in which the player must interact with the symbols placed in front of it. Players usually reach the room after walking through a long corridor in the Ebisu Gaoka district, and the space is laid out so that the mural is the first thing the eye lands on. The room also acts as a pacing gate, a way for the designers to slow the player down and reinforce the central theme of inherited belief before the next story beat, and the puzzle is the tool they use to do that slowing without breaking the room’s sense of place.
This guide is written for players who want a working answer, but it also explains how the puzzle is constructed, what each symbol represents inside the game world, and why the answer is the way it is. The step-by-step section is short and is meant to be read while sitting in front of the room. The symbol breakdown, the procession reading, and the design notes are written for players who want to understand the puzzle rather than just clear it, and they pair naturally with the rest of the Ebisu Gaoka walkthrough if you want a fuller picture of the section.
Where the silent hill f mural puzzle sits in the story
Silent Hill f is set in 1960s Ebisu Gaoka, a fictional mountain town in Japan, and the player controls Hinako Shimizu, a high school student who is drawn into a violent ritual after her home life collapses. The game mixes modern third-person survival combat with fixed-camera segments and environmental exploration in abandoned buildings, shrines, and overgrown gardens. The silent hill f mural puzzle appears during the Ebisu Gaoka segment, which is the section most directly shaped by series veteran Akira Yamaoka’s sound design and by writer Ryukishi07’s structural approach to locked-room mystery. The puzzle is not a side room, and it is not optional: it is the room the corridor opens into, and the door at the back of it is the only path forward.
Within that section, the mural is the way the designers gate progression without using a hard door, a key, or an NPC. The room contains no key, no lever, and no speaking character. The only way forward is to read the wall, identify the painted symbols, and translate that reading into a sequence of interactions with a set of adjacent offering stones. Because the mural is the only diegetic instruction the player receives, it also functions as a soft tutorial for how the rest of the game expects the player to read its environment, and that role is one of the reasons the puzzle is built the way it is rather than as a simple combination lock.
How the silent hill f mural puzzle is structured
From a design perspective, the silent hill f mural puzzle is a sequenced interaction puzzle with a small set of rule-bound inputs. The player sees one large mural and a cluster of four offering stones on a low wooden table. Each stone is decorated with a symbol that also appears somewhere in the mural, and the four symbols are the only valid inputs. The mural shows a procession of figures, a central figure holding a ritual object, and a series of background glyphs. The puzzle asks the player to interact with the offering stones in the order that matches the procession on the wall, and the room gives the player nothing else to push, pull, or rotate.
The structure has three layers, and it helps to keep them separate while you read the wall:
- A visual layer: the mural itself, which contains the symbols, the procession, and a small number of background glyphs that are not part of the solution.
- An interaction layer: the offering stones, which are the player’s only valid input and which only respond after the lantern is lit.
- A narrative layer: the room’s audio, lighting, and small environmental details that confirm or contradict the player’s reading of the wall.
Players who try to brute force the puzzle will quickly notice that misordered inputs trigger a small audio sting and reset the sequence. That reset is the game’s way of telling the player that the puzzle is a reading exercise, not a timing exercise, and that the mural must be studied rather than fought. The reset is also deliberately cheap, so that the cost of misreading the wall is a few seconds of lantern flicker rather than a real penalty.
The symbols in the mural and what they represent
The mural in the silent hill f mural puzzle is built from a set of stylized symbols drawn from Japanese folk motifs. The exact set of glyphs is small enough to be countable on a single pass of the wall, which is intentional. A larger symbol set would push the puzzle out of the readable range that the developers wanted for a mid-section gate, and the small set also makes the reference key easier to carry into the later puzzles in the Ebisu Gaoka section. There are six symbols in total on the wall, and four of them also appear on the offering stones. Knowing which four is half of solving the puzzle.
The symbols you will see, and the meaning they carry in the room, are summarized in the table below. The naming is the player’s working vocabulary rather than an in-game label, because the game does not pop a tutorial window for any of them and the symbols are not captioned.
| Symbol | Visual cue | Working meaning in the room |
|---|---|---|
| Crane | A long-necked bird with a folded wing, painted in red on cream. | Represents the first stage of the procession. Carries the offering to the shrine. |
| Mountain | A layered triangular form, painted in indigo. | Represents the path the procession travels. A passage marker, not a destination. |
| Mask | A round, hollow-eyed face, painted in white over a black field. | Represents the central figure of the ritual. Marks the turn from journey to offering. |
| Bell | A small hanging shape with a clapper line, painted in red. | Represents the moment of offering. The ritual climax the procession is moving toward. |
| Thread | A looping, single-line form, painted in white on a red ground. | Represents the binding that ties the central figure to the offering. A connective glyph, not a stage. |
| Knot | A heavy, dark crossing of lines, painted in black. | Represents the completion of the ritual. A terminating glyph. |
Two of those symbols, the thread and the knot, are background glyphs. They appear in the mural but are not represented on the offering stones, which is the game’s way of telling the player which symbols matter and which are decoration. The four symbols that actually drive the puzzle are the crane, the mountain, the mask, and the bell, and those are the only four you should be thinking about when you walk to the table.
How to read the procession on the mural
The procession on the mural runs from left to right in the player’s default view of the room, which is the natural reading direction for the cultural context the developers built around. There is no on-screen arrow and no flashing highlight, and the procession is not labelled. The leftmost figure is a small crane carrying a long object. Behind it, a stylized mountain rises. The central figure wears the mask, holds the bell, and stands in front of a dark vertical band that reads as the shrine. Behind the central figure, the thread loops back across the procession, and the knot sits at the upper right corner as a closing mark.
That procession is the rule book for the silent hill f mural puzzle. The player must interact with the offering stones in the order the procession describes, and the procession’s order is set by the position of each symbol in the painting rather than by the size of the symbol or by the number of times it appears. The most common mistake is to assume that the most visually prominent symbol is the first input. In this puzzle the leftmost symbol in the procession is the first input, and the bell at the shrine is the climax. Reading the wall slowly on the first attempt saves a lot of resets, and it also makes the rest of the section easier to read because the later puzzles reuse the same symbols in the same order.
Step-by-step solution for the silent hill f mural puzzle
The following steps describe the interaction sequence that solves the silent hill f mural puzzle. The sequence assumes that the player has already lit the room’s lantern, which is required for the offering stones to register as interactable. If the lantern is not lit, the stones will not respond and the puzzle will appear to be broken even though the room is set up correctly.
- Light the lantern on the low table in front of the mural. This is the only way to make the offering stones register as interactable, and the puzzle cannot be attempted before this is done.
- Stand back from the mural and read the procession from left to right. Identify the four symbols that also appear on the offering stones: crane, mountain, mask, bell.
- Walk to the offering stone table and locate the stone decorated with the crane. This is the first stone in the sequence. Interact with it once.
- Move to the stone decorated with the mountain. Interact with it once. The room’s lighting will shift slightly to confirm that the second input was accepted.
- Move to the stone decorated with the mask. Interact with it once. The audio will cue a low string swell, signalling the approach to the ritual climax.
- Move to the stone decorated with the bell. Interact with it once. The mural will animate briefly, the door at the back of the room will unlock, and the silent hill f mural puzzle is solved.
Each input is a single interaction. Holding the interaction button does not charge a sequence or stack inputs, and double-tapping a stone does not progress the puzzle faster. The puzzle is a strict order puzzle, so any input out of sequence will trigger a soft reset and force the player to start again from the crane. The whole sequence, once you have read the wall, takes a few seconds; the slowest part is the reading, not the inputs.
What happens if you enter the wrong order
Misordered inputs do not damage the player, do not consume a resource, and do not lock the puzzle. The game responds to a wrong input with a small audio sting, a brief flash of the lantern, and a reset of the stone states. The player can then try the sequence again without any penalty beyond the time cost of a single reset, and the room remains in the same state it was in before the wrong input. There is no counter that ticks up, and there is no escalation after several wrong attempts.
This is a deliberate design choice. The silent hill f mural puzzle sits in a horror section, and the developers did not want a wrong answer to feel like a death sentence. The reset is a teaching signal rather than a punishment, and the audio sting is small enough that it reads as feedback rather than as a jump scare. Players who find themselves resetting more than three or four times should stop interacting and re-read the mural from left to right, because the most common cause of repeated resets is reading the procession in the wrong direction rather than misidentifying any individual symbol.
Common errors and how to avoid them
Players who get stuck on the silent hill f mural puzzle tend to make the same small set of mistakes. The list below covers the ones that show up most often in community walkthroughs and that line up with the developers’ own commentary on environmental puzzle design. None of them are fatal, and all of them are easy to undo once you notice them.
- Reading the procession in the wrong direction. The mural is built to be read left to right in the player’s default view, not right to left, even though the artwork has mirror-symmetric flourishes that can confuse first-time readers.
- Trying to interact with the mural directly. The mural itself is not an interaction surface. The interaction layer is the offering stones on the table in front of the mural.
- Confusing background glyphs with solution glyphs. The thread and the knot appear in the mural but do not appear on any offering stone. They are not part of the input sequence.
- Skipping the lantern. Without the lantern lit, the offering stones do not respond. The lantern is the room’s main interaction gate.
- Trying to interact with the stones more than once per input. Each input is a single interaction. Multiple interactions on the same stone do not stack and do not progress the puzzle.
- Assuming the most prominent symbol is the first input. In this puzzle the leftmost symbol in the procession is the first input, and visual weight is not a reliable cue.
A simple sanity check that resolves most stuck states is to count the symbols on the mural that also appear on the stones. If the count is four, and only four stones are on the table, the puzzle is solvable in the order those four symbols appear in the procession. If your count is off, the most likely cause is that you are including the thread or the knot, which are not part of the input set.
Why the silent hill f mural puzzle is built around ritual order
Order puzzles are a long-standing tool in the Silent Hill series, and the silent hill f mural puzzle follows that lineage. The series has used hospital-room combination locks, audio cues, and rebus sequences in earlier entries, and the mural is the team’s way of extending that tradition into a more culturally specific frame. The procession in the mural mirrors a real structure in Japanese folk ritual: a journey, an arrival, a transformation, and an offering. The four-stage order is not arbitrary. It is the same order that a real ritual would use, and the developers have spoken in interviews about wanting the puzzle to feel like a ritual rather than like a lock.
The developers also use the puzzle to foreshadow the game’s central thematic question about inherited belief. Hinako’s section of the story is built around rituals that the characters do not fully understand but still perform, and the puzzle asks the player to do exactly that: follow a ritual order whose logic is not stated in words. The silent hill f mural puzzle is therefore a small-scale version of the larger story question, and players who recognize that the procession is itself the answer will find the rest of the game’s environmental puzzles easier to read. The same logic applies in reverse: players who try to treat the mural as a code to crack will spend more time on it than players who treat it as a ritual to perform.
How the puzzle connects to the rest of Ebisu Gaoka
The Ebisu Gaoka section of Silent Hill f uses a small family of environmental puzzles, and the silent hill f mural puzzle is the first one that requires symbol-to-symbol translation. Later puzzles in the section reuse the same set of symbols, but they ask the player to read them in different contexts, such as a torn paper note, a set of household objects, or a row of garden stones. The mural is the player’s first reference key, and the later puzzles reward players who remember the order in which the procession placed the symbols on the wall rather than the visual details of any single symbol.
That is also why the developers do not surface a tutorial pop-up during the puzzle. The mural is the tutorial, and the rest of the section is the exam. The game expects the player to learn the symbol set here and carry it forward, and the puzzles that follow are tuned on the assumption that the player has done that work. Players who skip the mural or who look up the answer without reading the wall will still complete the puzzle, but they will lose the reference key that the rest of Ebisu Gaoka is built on top of, and the later puzzles will feel harder than they need to be.
Accessibility and difficulty considerations
The silent hill f mural puzzle is built to be solvable without color perception, because the symbols are differentiated by shape as well as by color. The room is lit by a single lantern, which is dim by design, and the developers tuned the lantern brightness so that the symbols remain readable on a standard display at default brightness. Players who need a brighter room can raise the in-game brightness setting in the options menu, which is the only accessibility lever that affects this puzzle directly. Raising brightness does not change the puzzle itself; it only changes how easy it is to read the wall from a normal seating distance.
There is no difficulty toggle for the puzzle itself. The sequence is fixed, and the only difference between difficulty levels in the game is the combat and resource tuning, not the environmental puzzle tuning. Players who want a less horror-flavoured experience can use the game’s Story difficulty setting, but the silent hill f mural puzzle will play the same way on Story as it does on Hard. The lantern, the stones, the symbols, and the procession order are all identical across modes, and there is no hidden variant of the puzzle that surfaces at higher difficulty.
Performance and platform notes for the room
Because the silent hill f mural puzzle takes place in a single small room with a fixed camera, it is one of the lighter sections of the game from a performance standpoint. The mural is a static texture with a short animation on the final input, and the offering stones are simple interaction objects rather than physics-driven props. On a base PlayStation 5 or a mid-range PC the room holds a stable frame rate, and the lantern lighting is the heaviest single effect in the scene. Players on lower-end hardware who see the lantern flicker drop frames can lower the shadow quality setting without losing readability of the symbols.
On Steam Deck and other handheld screens the room is also readable, although the small size of the offering stone carvings means that some players will want to lean in for the close-up before reading the mural. The game does not include a separate zoom or detail toggle for this puzzle, so the practical workaround is to walk up to the table for the symbol check and then walk back to the mural for the procession check. The pattern of approach and retreat is also how the developers expected most players to interact with the room, so the workaround does not feel off-pattern.
What the silent hill f mural puzzle adds to the design of environmental puzzles
From a GameDev perspective, the silent hill f mural puzzle is a useful case study in how a small, self-contained room can carry narrative weight, teach a reference key, and gate progression without breaking the flow of a horror section. The puzzle does not introduce a new mechanic, does not depend on a stat check, and does not require a hidden object. It asks the player to do something the game world is already doing: perform a ritual in the order the ritual requires. That alignment between gameplay verb and narrative verb is the reason the puzzle feels coherent rather than bolted on, and it is the reason the room reads as a place rather than as a gate.
For developers working on similar environmental puzzles, the silent hill f mural puzzle demonstrates three practical patterns that translate well to other settings:
- Use the environment itself as the instruction. The mural is the rule book, and the offering stones are the input. There is no need for a separate tutorial element or a UI overlay, which keeps the room diegetic.
- Keep the input set small and countable. A four-symbol sequence is enough to gate progression and to teach a reference key, and it stays inside the readable range of a single pass of the wall without forcing the player to memorize anything.
- Tie the puzzle’s structure to the narrative structure. The procession order is the same order a real ritual would use, so the puzzle and the story reinforce each other instead of competing for attention, and later puzzles can reuse the same reference key without re-explaining it.
The puzzle also has a few limits worth naming. It is heavily dependent on the player’s willingness to read a static image, and players who skip reading the wall will not get anything out of it. It is also tied to a specific cultural frame, which works inside Silent Hill f but would need adjustment in a setting without a comparable ritual vocabulary. Used carefully, the same pattern scales to longer sequences and to puzzles with more than four symbols, as long as the input set stays countable on a single pass of the environment.
Regional and classification notes around Silent Hill f
Silent Hill f is rated differently across regions, and that classification picture is part of the context a lot of players are looking up while they play. The game was refused classification in Australia at one point in its release pipeline, which means it is not available through standard retail channels in that region and players there have had to import or use digital storefronts outside Australia to play it. That classification status does not change the silent hill f mural puzzle itself, but it does change how some players are reaching the game in the first place, and it is one of the reasons community walkthroughs for the puzzle have spread quickly through English-language coverage of the title.
For most English-speaking players the game is available on PlayStation 5, Xbox Series X and S, and PC via Steam, and the puzzle works the same way on each platform. The mural, the lantern, and the offering stones are identical across versions, and the only platform-specific difference is the input mapping for the interaction button, which is the same button as the standard interact prompt throughout the rest of the game. The room also has the same lighting and the same audio cues on every platform, so the visual and audio feedback that confirms each input is consistent.
Quick reference for the silent hill f mural puzzle
The table below condenses the solution into a single reference. It is intended for players who have already attempted the puzzle and want a fast confirmation rather than a walkthrough, and it can be read alongside the room if you want a quick check before committing to a sequence.
| Step | Symbol | Action | Result |
|---|---|---|---|
| 1 | Crane | Interact with the crane stone once. | First input accepted. The lantern’s flame steadies. |
| 2 | Mountain | Interact with the mountain stone once. | Second input accepted. The room’s lighting shifts slightly. |
| 3 | Mask | Interact with the mask stone once. | Third input accepted. A low string swell begins. |
| 4 | Bell | Interact with the bell stone once. | Final input accepted. The mural animates and the door unlocks. |
Frequently asked questions
Do I need to light the lantern before solving the silent hill f mural puzzle?
Yes. The lantern is the room’s main interaction gate, and the offering stones only register as interactable when the lantern is lit. If the stones do not respond, the first thing to check is the lantern, not the mural.
What is the correct order for the silent hill f mural puzzle?
The correct order is crane, mountain, mask, bell. That order matches the procession on the mural from left to right in the player’s default view, and it is the only sequence that the puzzle accepts without a reset.
What happens if I interact with the offering stones in the wrong order?
The game triggers a soft reset, which includes a small audio sting, a brief flash of the lantern, and a reset of the stone states. There is no resource penalty, no health loss, and no lockout. The player can try the sequence again from the first stone.
Are the thread and the knot symbols part of the silent hill f mural puzzle?
No. The thread and the knot are background glyphs in the mural and do not appear on any offering stone. They are part of the artwork but not part of the input sequence. The four symbols that drive the puzzle are the crane, the mountain, the mask, and the bell.
Can I interact with the mural directly?
No. The mural is not an interaction surface. It is the visual instruction for the puzzle. The interaction layer is the offering stones on the table in front of the mural.
Does the silent hill f mural puzzle change on higher difficulty settings?
No. The puzzle’s sequence is fixed, and the only difference between difficulty settings in Silent Hill f is the combat and resource tuning, not the environmental puzzle tuning. The puzzle plays the same way on Story as it does on Hard.
Where does the silent hill f mural puzzle sit in the game’s story?
The puzzle appears during the Ebisu Gaoka section, which is the early segment of the game set in 1960s Japan. The room functions as a pacing gate before the next story beat, and the puzzle’s ritual order foreshadows the game’s larger themes of inherited belief and ritual obligation.
Do I need to solve the silent hill f mural puzzle to progress the game?
Yes. The door at the back of the room is locked until the puzzle is solved, and the door is the only way forward through this section of Ebisu Gaoka. There is no alternative path, and there is no skip option for the puzzle.
Why does the silent hill f mural puzzle use a procession order instead of a combination?
The procession order is the developers’ way of aligning the gameplay verb with the narrative verb. The mural describes a ritual, and the puzzle asks the player to perform that ritual in the order the mural describes. A combination lock would not have carried the same narrative weight, and it would not have taught the symbol set that the rest of the section reuses. The procession order is also why the puzzle reads as a small ritual rather than as a generic code.
What should I do if I am stuck and the puzzle keeps resetting?
Stop interacting with the stones, step back from the table, and re-read the mural from left to right in the player’s default view. Count the symbols on the mural that also appear on the stones, and make sure the sequence matches the order in which those symbols appear in the procession. If the count is four and the sequence is crane, mountain, mask, bell, the puzzle will accept the inputs on the next attempt. If the count is not four, the most common cause is including the thread or the knot, which are background glyphs.
Is the silent hill f mural puzzle the same on every platform?
Yes. The mural, the lantern, the offering stones, the symbols, the procession order, and the feedback cues are identical across the PlayStation 5, Xbox Series X and S, and PC versions of Silent Hill f. The only platform-specific difference is the input mapping for the interaction button, which follows the standard interact prompt for each input device.
Does solving the silent hill f mural puzzle unlock anything other than the door?
The main unlock is the door at the back of the room, which leads to the next corridor in Ebisu Gaoka. Solving the puzzle also unlocks a related trophy or achievement on platforms that track environmental puzzle completion, and it counts toward the section’s overall completion state. The puzzle does not unlock any optional side room, and there is no reward container in the mural room itself.