
Minecraft Japanese Temple: Complete Builder’s Guide
There’s something about a Japanese temple that just hits different in Minecraft. Maybe it’s the layered roofs, the stone lanterns casting warm light along gravel paths, or the way a torii gate frames a distant mountain. Whatever it is, this build style has quietly become one of the most popular creative projects in the community – and it’s not hard to see why when you see the screenshots of Minecraft Japanese temple builds.
But here’s the thing: a lot of players give it a shot, place some dark oak logs, slap on a sloped roof, and call it done. Then they look at it and think, that’s not quite right. Because it isn’t. Real Japanese temple architecture – the kind that inspired countless builds on YouTube and Reddit – has a specific visual language. And once you understand that language, everything clicks into place.
This guide covers all of it. Materials, structure, roof styles, landscaping, mods, biome selection – the works. Whether you’re brand new to large builds or you’ve already got a few castles under your belt, there’s something here for you.
Why Japanese Architecture Translates So Well to Minecraft?
Before touching a single block, it’s worth asking: why does this style work so naturally in a game made of cubes?
The answer is actually kind of obvious. Traditional Japanese architecture is built around symmetry, clean lines, and repetition. Straight wooden columns spaced at regular intervals. Roofs that follow predictable angles. Courtyards defined by clear axes. These are all things Minecraft’s grid system handles beautifully. Compare that to, say, trying to build a Gothic cathedral with all its arches and irregular stonework – that’s genuinely painful. Japanese builds, by contrast, reward methodical planning.
There’s also the material philosophy. Japanese architecture leans into natural textures: raw wood, stone, bamboo, and earth. Minecraft’s block palette – especially after the 1.20 Cherry Grove update – gives builders a rich selection of exactly those materials. Spruce, dark oak, stone bricks, bamboo blocks, cherry wood, terracotta in earthy tones. It all lines up almost too well.
Picking the Right Biome for Your Minecraft Japanese Temple
Location matters more than most builders realize. Dropping a Minecraft Japanese temple into the middle of a desert or a snowy tundra can kill the mood before you’ve placed a single decorative lantern.
The best biomes for this style are:
- Cherry Grove – introduced in 1.20, this is basically made for Japanese builds. Pink petals drifting from overhead canopies, soft terrain, gentle hills. It’s as close to a sakura setting as the game gets.
- Bamboo Jungle – provides natural bamboo for fencing, railings, and garden decoration. The dense greenery also creates a sense of enclosure that fits a temple complex well.
- Forest or Birch Forest – reliable, lush, and easy to work with. Good for players who want a more subdued, autumn-toned setting.
A mountain backdrop is always a bonus. If your temple sits near a cliffside or overlooks a valley, the sense of depth makes the whole build feel intentional – like it belongs to that world, not just dropped into it.
The Core Material Palette
Getting your blocks right is half the battle. Here’s what experienced builders consistently reach for when working on a Minecraft Japanese temple:
| Block | Role in the Build |
|---|---|
| Dark oak logs / stripped dark oak | Main pillars, structural columns, roof trim |
| Spruce planks / spruce stairs | Walls, roof layering, eave detailing |
| Stone bricks / cobblestone | Foundation, pathways, garden walls |
| White concrete or white terracotta | Shoji screen effect on windows and interior walls |
| Blackstone / polished basalt | Accents, darker roof elements, steps |
| Cherry wood planks | Warm interior floors, decorative details in cherry grove builds |
| Bamboo blocks | Fences, garden dividers, railings |
| Lanterns (regular and soul) | Lighting under eaves, along pathways |
| Glass panes | Window insets behind white concrete for shoji transparency effect |
| Terracotta (red, black, grey) | Roof tiles on pagoda-style upper levels |
One thing worth noting: don’t pick just one wood type and stick with it everywhere. Mixing spruce with dark oak, or layering cherry planks over a stone brick foundation, creates that depth and visual texture that separates a good build from a great one. Real Japanese buildings use contrasting materials constantly – dark beams against white plaster, stone bases under wooden walls. Mimic that.
How to Build a Minecraft Japanese Temple: Step by Step
Laying the Foundation and Planning the Layout
Start with the ground plan. A symmetric layout – whether square or rectangular – is essential. Odd numbers work well for spacing: a 9×9 base, 13×13 for something larger, 7×21 for a long hall-style structure.
Lay your foundation in stone bricks or smooth stone. Raise it at least 2-3 blocks above ground level so the temple sits elevated, which gives it that commanding, sacred quality. Add stone steps leading up from a central path – those stairs communicate immediately that you’re approaching something important.
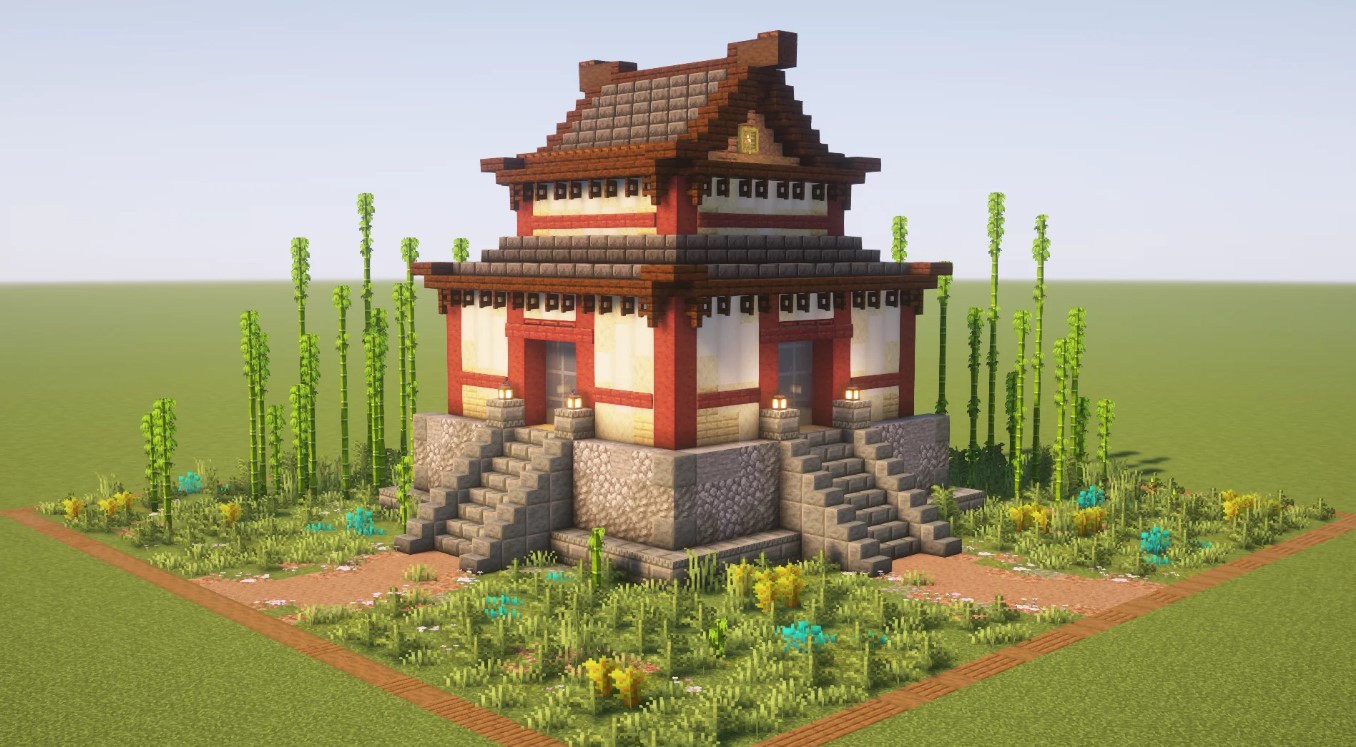
Mark your corner columns first using dark oak or spruce logs. These pillars define the grid of the structure. Space them evenly – every 4 blocks is a good rule. Once the columns are up, the walls between them practically fill themselves in.
Building Walls That Actually Look Japanese
Plain plank walls are where beginners often go wrong. Solid wooden walls feel heavy and European, not East Asian. The trick is breaking up the wall surface.
Here’s what works:
- Alternate wood planks with glass pane sections (framed in wood) to suggest shoji screens.
- Cap every wall segment with a slab to create a horizontal shadow line.
- Add trapdoors against walls to suggest paneling or lattice detail.
- Leave gaps at regular intervals – Japanese buildings breathe.
White concrete or white terracotta in the panels between dark wood columns sells the shoji aesthetic instantly. It’s one of those tricks that looks complicated in the final build but is actually straightforward to execute.
The Roof – the Most Important Part
The roof makes or breaks a Japanese temple’s build. This is where most people get frustrated, and honestly, it’s worth spending extra time here because it defines the entire silhouette.
Japanese roofs have two defining features: overhanging eaves that extend well beyond the wall below, and a gentle curve upward at the corners. Minecraft can’t do literal curves, but you can fake it convincingly.
Here’s a reliable method for a medium-sized structure:
- Start your roof one block out from the wall on all sides – that’s your eave.
- Use stairs (facing outward) as the first row, which creates a slight overhang angle.
- Stack slabs on top of stairs to build the slope upward in steps.
- Every 2-3 blocks of height, offset the next row inward by one block.
- Cap the top with a ridge of logs, slabs, or upside-down stairs.
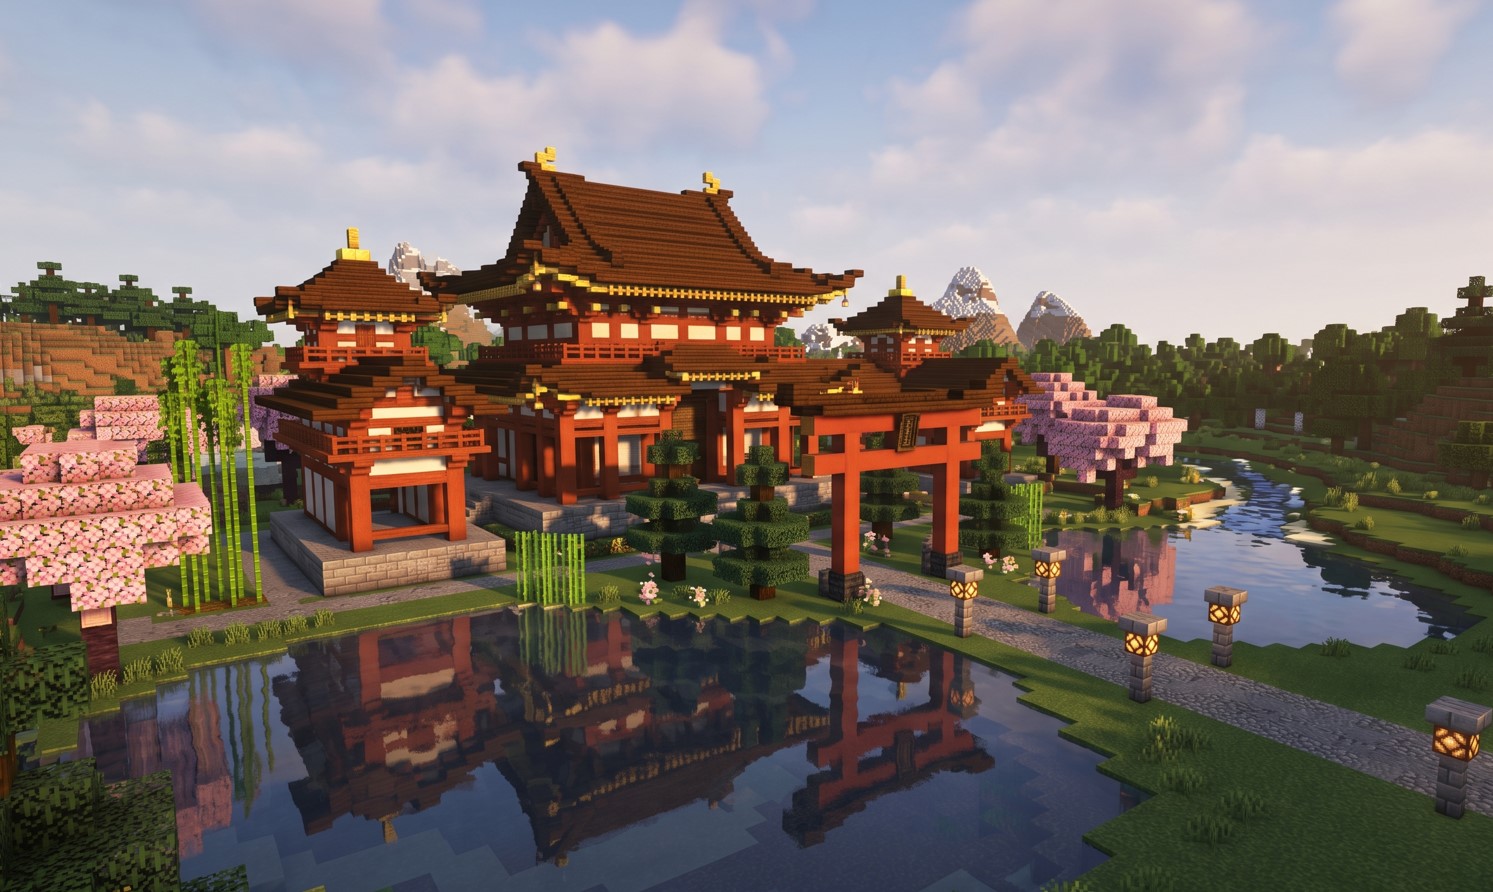
For a tiered pagoda effect, build the same roof structure at multiple levels with decreasing footprints. Two or three tiers looks authentic. Four starts to feel excessive unless you’re going for something truly grand.
Soul lanterns hung under the eaves are a brilliant finishing touch. They cast a blue-tinted light that reads as warmer than you’d expect and adds an immediately “ancient” quality to the structure.
Decorating the Interior
Most players pour all their energy into the exterior, then walk through the door and think: okay, now what? A bare, empty room kills the atmosphere completely.
Japanese interiors are about open space and intentional placement – not clutter, not furniture crammed into every corner. A few well-chosen details go further than a packed room.
Some things that work well:
- Hay bales as tatami mats – lay them flat on the floor in a 2×1 or 3×2 arrangement.
- Flower pots with small plants or bamboo placed in corners and near entrances.
- Item frames on walls with decorative items inside – maps, weapons, armor pieces suggest history and purpose.
- Bookshelves or chiseled stone bricks lining interior walls in the main chamber.
- A small altar area at the far end: a raised stone platform, a chest or hopper below, candles or soul lanterns above – it reads as a shrine space immediately.
Keep the floor material consistent and simple: polished stone, wood planks, or carpet in muted tones. The interior should feel like a place of purpose, not storage.
Landscaping: the Part Everybody Skips
Here’s the honest truth – the garden and surrounding environment matter just as much as the temple itself. A beautifully detailed structure surrounded by unmodified terrain looks like a house lifted from a tutorial video and dropped somewhere random. Japanese temple complexes are inseparable from their environment.
Essential landscaping elements to include:
- A gravel or stone slab path leading from the build’s entrance, flanked by lanterns – ideally stretching into the distance
- A torii gate at the path’s beginning: two vertical posts connected by a horizontal beam, traditionally built in red concrete or red terracotta with a dark top bar. Two pillars, two crossbeams – simple but unmistakable
- Bamboo clusters placed at irregular intervals around the perimeter
- A small pond or stream near the courtyard, ideally with lily pads, gravel at the bottom, and stone placed at the water’s edge
- Cherry blossom trees (in a cherry grove biome) or custom-built trees using dark oak logs with jungle or spruce leaf blocks for a more traditional look
- Zen garden section: a flat square of gravel surrounded by stone walls with a few placed boulders (stone or diorite blocks) and a minimalist shrub or two
None of this takes long individually. Together, it transforms the build from a structure into a place.
Mods That Make Minecraft Japanese Temple Builds Easier
If you’re on Java Edition and want to push things further, the modding community has genuinely useful tools for this style. On CurseForge, there are several dedicated mods worth checking out:
- Japanese Dungeons and Culture (1.20.1, Forge) – adds Japanese-inspired structures to world generation, useful for reference and for sourcing rare decorative blocks.
- Japan Props – street-level props including lanterns and structural decorative pieces.
- Various furniture mods that add real Japanese-style furniture: low tables, floor cushions, sliding screens.
For builders who want precision placement, Litematica (a schematic mod) is invaluable. You can download community-built Japanese temple schematics, study how experienced builders solved specific problems like multi-tier roofs, and then build your own version informed by what you learned.
The site Sereyka.com hosts layer-by-layer 3D build guides specifically for Japanese structures, including downloadable Litematic files compatible with both Java and Bedrock 1.21. That’s a genuinely useful resource if you’re stuck on a specific detail.
Small Temple vs. Large Complex: Which Should You Build?
This is actually a more important question than it sounds, and it depends on two things: your skill level and your patience.
| Feature | Small Temple | Large Temple Complex |
|---|---|---|
| Footprint | 9×9 to 13×13 | 30×30 and up |
| Build time | A few hours | Days to weeks |
| Skill level | Beginner-intermediate | Intermediate-advanced |
| Biome suggestion | Any | Cherry Grove or Forest |
| Best for | Survival mode, early game | Creative mode, showcase worlds |
| Key challenge | Proportions feeling right | Maintaining visual consistency |
For beginners, starting small isn’t settling – it’s smart. A compact 9×9 temple with one decorative tier roof, a simple stone path, and a torii gate teaches you the proportions and block choices you’ll need for anything larger. Master the small version first. The large version will come out much stronger for it.
Common Mistakes and How to Fix Them
A few things consistently trip up builders new to this style:
- Roof that’s too steep. Japanese roofs have a moderate pitch – not the sharp angle of a European church. If your roof looks like a pointy hat, flatten it. Add more slab layers per vertical step.
- Walls that are too uniform. Dark oak planks wall-to-wall, floor to ceiling, with no variation reads as a log cabin. Break up the surface with different block types, glass panes, and trapdoors.
- Skipping the eave overhang. The roof should extend beyond the wall. That overhang is what gives the silhouette its characteristic look. Even one block of overhang makes a huge difference.
- No elevation change. Japanese temples sit above their surroundings. If your structure is at ground level, it reads as a house. Raise the platform. Add stairs. Give it presence.
- Forgetting the gate. A torii gate at the entrance is one of the fastest ways to establish the aesthetic before visitors even reach the main building. Two blocks wide, two crossbeams – don’t skip it.
FAQ
Do I need Creative mode to build a Japanese temple in Minecraft?
Not at all. Many builders complete smaller temple builds entirely in Survival mode. It just takes longer to gather the materials – stone bricks, dark oak, and lanterns are all accessible without cheats.
What’s the best biome for a Minecraft Japanese temple?
The Cherry Grove biome (added in 1.20) is the community favorite – the pink trees and falling petal particles create an instant sakura atmosphere. Bamboo jungles and forested hillsides are solid alternatives.
How do I build a curved roof in Minecraft?
You can’t make a literal curve, but stairs and slabs stacked in offset rows create a convincing approximation. Use stairs for the eave edges and slabs to build the slope. Offsetting inward by one block every two rows gives the roof its gentle “curve.”
What blocks make the best shoji screens?
White concrete or white terracotta panels framed by dark wood logs, with glass panes set directly behind them, creates the translucent shoji screen effect. It’s one of the most effective tricks in the Japanese build toolkit.
Can I build a Japanese temple on Bedrock Edition?
Yes. All the core blocks used – spruce, dark oak, stone bricks, lanterns, terracotta, bamboo – are available on Bedrock. Litematic files (for Java) won’t work, but sites like Sereyka.com offer 3D block-by-block guides that work for both editions.
How do I build a torii gate in Minecraft?
Place two vertical posts of red concrete (3-4 blocks tall), then add two horizontal beams connecting them – one at the top and one slightly below. Add a dark slab or blackstone block on top of the upper beam. That’s the classic torii silhouette done.
What mods add Japanese content to Minecraft?
For Java Edition, Japanese Dungeons and Culture (CurseForge, 1.20.1) adds structures and decorative elements. Japan Props adds street-level detail pieces. Various Japanese furniture mods add interior items like low tables and decorative screens. Check CurseForge for the latest versions.
Wrapping Up
A Minecraft Japanese temple is one of those builds that rewards patience in a way few others do. The style has rules – symmetry, natural materials, elevated platforms, layered roofs – and those rules actually make the build process clearer, not harder. Once you know what belongs and what doesn’t, decisions come fast.
Start small, get your proportions right, don’t skip the garden. The aesthetic carries even in a modest build, and once the torii gate is up and lanterns are glowing along the stone path, you’ll understand why so many players keep coming back to this style. It just feels right. And in Minecraft, feeling right is basically everything.
If you want to back our efforts, hitting that share button on social media and adding this page to your bookmarks makes a massive difference. We are constantly expanding our digital portfolio and love bringing new ideas to the table. Simply write to the BandurArt team directly if you are looking for a creative or commercial collaboration.